Decided to look into potentially getting a skate sharpener for use at home.
SparX Intelligent Sharpener (TCO ~$1,200)

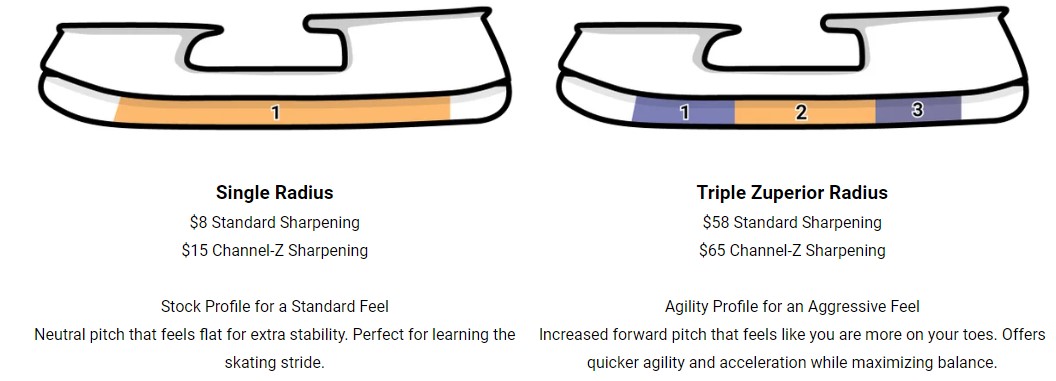
The latest advancement in home skate sharpeners is the SparX intelligent sharpener which are very user friendly devices, have great reviews, have consistent results and utilize an advanced "diamond-based" cutting wheel system. However they are pricey - still over $1,000 Cdn. and $80 per grind ring. These units are smart/computerized units, including monitoring the life expectancy of the wheel, but require that you purchase specific rings for each hollow/grind (at $80 per wheel). A key selling feature is that they also offer a modified "Flat Bottom V" option (or FBV called Fire Rings). FBV is the latest advancement in skate sharpening whereby there is much less of a cut into the skate blade to create an edge - therefore allowing for creating better "glide" speed (i.e. less resistance), yet still providing a sharp edge for quick turns.
Here are the FBV cut specifications:

The FBV cut is approx 1mm deep while a traditional hollow cut is approx 8mm deep (on a hollow 3/8" cut), therefore reducing glide "drag".
Radius of Hollow or ROH:
Tried-and-true, the original skate sharpening hollow profile is still the preferred choice and used today by the majority of professional and amateur hockey players around the world but FBV is making significant headway fast.
Here are the hollow profile cut specifications:

A smaller radius will give you more bite into the ice for tighter turns and quicker acceleration, but at the same time because your edges are digging deeper into the ice which causes greater friction, your glide and speed will suffer (Also a more pronounced radius will be more fragile and less durable).
A larger radius therefore gives you greater glide and speed (speed skater’s blades are completely flat!) causing less fatigue, but less bite for maneuverability, so choose which advantages are more important for you and your skating style.
VARIABLES TO CONSIDER
The main variable to consider when first picking a radius to try is weight. As a rule, the heavier the skater, the larger the radius needed. An extremely light skater can tolerate a very small radius (producing a deep hollow with lots of edge) because they do not have much weight to bear on the ice.
A heavy skater trying to skate on a small radius (too much edge) will bite into the ice so hard that they will have trouble stopping without chatter or going over the top of their skates. Another disadvantage is they will also lose glide to excess friction and be working harder to skate full speed. On the other hand, they will be able to hold a very tight turn! Please note that beginner level skaters can learn most skills (particularly the hockey stop) easier by grinding their skates with a very large radius. As they progress the radii is decreased back to a normal level.
A “general purpose” chart for radius by weight is as follows:
|
Very Light |
3/8″ |
|
Light |
1/2″ |
|
Average |
5/8″ |
|
Heavy |
3/4″ |
|
Goalie |
1 – 1 1/4″ |
Another variable to consider is ice temperature. Most rink managers shoot for an ice temperature of approximately 25 degrees Fahrenheit. A temperature of 17 to 23 degrees is considered “hard hockey ice,” 25 to 26 degrees is considered good figure skate ice. Slightly smaller radius may be used on colder/harder ice and vice versa.
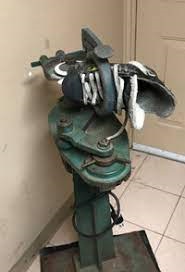
Fleming Gray "Swing Arm" B2/B3 Units (TCO ~$600-$2,000)
The Fleming Gray Swing Arm B2/B3 units have been around for ever (or for many years) and use a 6" x 1/4" x 3/4" Sharpening Wheel (Wheel Diameter, Wheel thickness, Arbor Diameter) . Standard finishing grit is 80. An 80 grit wheel is approximately $25 and a second-hand or used B2 unit costs around $600-$2,000.
Grinding wheels for skates with "Hard Stainless" should use "Ruby Aluminum Oxide with Chromium".
B2/B3 Manual
Here is a manual on how to set up and use a Fleming Gray B2/B3 unit.
Which “Grit” to Use?
80 grit is a finer grit than 60 grit.
The finer the grit, the more defined edge and finish it leaves.
Ruby wheels are high in chromium. It needs more pressure to cut. The blue wheel has aluminum oxide. Doesn't burn as easily, and cuts cool.
60 / 80 Grit


Here is where to order the grinding replacement wheel(s)
Changing Wheels
You will need a 1 1/8” wrench and a 1/2” wrench to loosen the locking nuts. And you turn the 1/2” wrench to the right (as if you are tightening it) to remove the locking nut.
Warning
Always “Ring Test” your wheel by taping it with a wrench and it should make a bell-like sound!! Otherwise it is likely a faulty and/or cracked wheel and could violently explode!!
Still Undecided
After completing my research including assessing the cost of each approach (Sparx @ $1,200 and Fleming Gray @ $600-$2,000 - $24K for the table tops), I am still not convinced of the value of investing in an SparX machine as good as they are as I am one person (albeit playing 4-5 times a week plus any tournaments) and as a result, I am going back and forth between investing in a SparX unit and going "old school" - possibly looking into finding an older "Swing Arm" grinder at a decent price - like the Fleming Gray B2 units where you can re-shape your grind wheel to any traditional hollow to adapt for ice conditions, etc.
A major contributor for my indecision (other than price) is that fact that I have yet to try an FBV grind/sharpen on my skates. If I were to stick with a traditional hollow profile, I definitely would not consider the investment in a SparX system as I am confident that I can create consistency in my skate sharpening using traditional hollow profiling on a B2 unit. However, if I am planning to transition and stick with an FBV cut - then I would have no option but to invest in a SparX unit.
Maybe it is time to try a FBV cut and see if it makes a noticeable/significant difference.
Final Decision
The final decision is to go with a traditional skate sharpening machine - Fleming Gray Swing Arm assuming I can find a used one at a reasonable price. Didn’t actually try the FBV - as time ran out as I decided to jump on a Fleming Gray when I found one listed in the area for an amazing price.
Done! I picked up the machine for $600 which needs a bit of tender loving care (that is an understatement!) but got it home and the machine motor spins and with some investments, hopefully I will get it cleaned up and running smoothy….

Next Steps
Placed an order with the Manufacturer (MFG - there supply subsidiary is Center Ice Supply for a couple 80 grit wheels and a few other bits.

After using the machine, it is apparent that I will also need an edge checker. These are expensive devices ($80+) but are imperative to ensure that the sharpening is straight/aligned properly. Also, I need to repair the Radius arm and pins - so I ordered a set of new radius pins and a new locking screw to see if that is all that is needed. When discussing the order with MFG - they said that the sharpening wax is not required and, in fact, gums up your wheel and is not recommended. For now, I am hoping that my dressing diamond is still ok....
Still contemplating whether I bother to clean/strip and paint the machine…
Sharpening
I dressed my stone using the pin that came with the machine. However, I have no idea as to what it’s default radius is. I am hoping around a 5/8 ROH. This experiment did not go well. Without a proper wheel and an edge checker, this causes an offset on the skate.
Once dressed, it is important for me to find the center point of the dressed stone (not the center of the stone itself). To do this, I plan to use the magic marker trick - putting black marker on the blade and then score the blade at the front and back - adjusting the machine to up/down to align to the center of my skate blade. Once aligned - sharpen away.
Loading a Skate
Always load the skate with the toe to the right as shown:

Also, finish a sharpen by following the direction of the spinning stone (to the right) with a lighter-even pressure (see sparks below).
Sparks
A spark length of 5” to 8” on a finishing grind is about right. Ten-inch spark or more will leave grooves down the skate blade which is not satisfactory.
So What is CAG
CAG is a true flat spot placed in the center of the blade.
The numbers refer to the number of millimeters of the flat spot in front of blade center/overall flat.
So if you see 60/120, you have 60mm flat in front of center and another 60mm flat behind.
If you see 65/120, you have 65mm flat in front and 55mm behind
The principle is that the flat spot grants you stability which can also allow you to go shallower on your ROH (Radius of Hollow or Radius).
Radius
As described above you can "Cag" or change the "Radius" of your skate blade (Note: this is different than the Radius of Hollow or ROH - which refers to the radius of the hollow cut into the bottom of your skate blade), however the complexity of sharpening increases dramatically as does the cost to sharpen these skates. In my case, I plan to stick to a "single" radius for now,,,,

So What Radius of Hollow Should I Use?
From above you can see that I will be using traditional hollows and therfore I need to decide on the Radius to use. Here are some good reference charts:


I plan to use the Skilled adult range starting at 3/4".
Update
Received the Grinding Wheels, Radius Pins and Blade Level guide.

The radius pins are approximate and here is the mapping to the 5 pins:

I am using the 3rd pin to test as it is approximately a 3/4" hollow.
The reason for the investment is the fact that you cannot trust the skate sharpening that you get. I had a real problem with my skates - so much so that I left a game and ran to to the proshop to get them checked and fixed. The level showed that my skate was way out of level. I had them fixed but they still are not ideal.
Here is the front and back of my skate after getting them re-done.


You can see that the front of the blade is perfectly flat - but the back is angled?? I could tell this when cutting hard at the blue line that there was something wrong at the back of my skate.
Time to tune up the machine and hone my skills to sharpen skates to perfection :-)