
![]()
In this article I show you how you can setup Kodi, clone your installation (addons, media and userdata) and stream over 2,000 IPTV channels
Kodi Setup
Simply go to https://kodi.tv to get the latest version of kodi for your device.
Wallpaper:

Suggestion: Put a copy into the build in root of KODI install
Streaming 2,000+ Channels
Add the IPTV Simple Client PVR Client to your Kodi install
Stream IPTV using the IPTV Free2View TV Project. You can read about it on GitHub and get the links for the playlists and the tv guides:
PROJECT NEWS (5/26/22)
Free2View TV Project page on Blogger is no longer available and will be replaced with general streaming TV links and resources
- moved to GitHub at the following GitHub address:
GitHub - Sphinxroot/Free2ViewTV: The official repository for the Free2View TV Project
You will also need the "IPTV Merge" plugin for Kodi available in the SlyGuy repository.
Here is a video walking you through an install of Kodi, configuration and adding IPTV Merge and the IPTV Simple client and showing how to configure the client to stream over 2,000 channels with many having associated tv guides.
Github to the Rescue
Github has also started to publish an m3u of channels from around the world. Here is the list
Free TV
This is an M3U playlist for free TV channels around the World.
Either free locally (over the air)
Or free on the Internet:
- Plex TV
- Pluto TV (English, Spanish, French, Italian)
- Redbox Live TV
- Roku TV
- Samsung TV Plus
- Youtube live channels
To use it point your IPTV player to
 https://raw.githubusercontent.com/Free-TV/IPTV/master/playlist.m3u8
For individual countries go to their respective lists.
Raw M3u
- Canada:
- US:
Custom Channel List
In the following article you can find additional channels and see how to configure IPTV Simple Client to load the m3u files.
How To? - Stream Custom Channels (Restricted)
Copy Kodi Config:
You now have a Kodi config that works and you want to copy it to another machine, box, etc. Simply install the same version of kodi, run it once and and copy over the 3 configuration directories.
- Windows: C:\Users\USERNAME\AppData\Roaming\Kodi\ (replacing USERNAME with your actual username)
- Linux: ~/.kodi/
- MacOS: /Users/USERNAME/Library/Application Support/Kodi/ (replacing USERNAME with your actual username)
Note: Under MacOS this folder’s content is hidden by default. To display it, open a terminal and navigate to the above folder by typing the following command
cd /Users/USERNAME/Library/Application Support/Kodi/
Next, enter the following command to display all hidden files in the folder.
chflags nohidden ~/Library
- iOS: /private/var/mobile/Library/Preferences/Kodi/
Note: There is no easy way to view hidden files or folders in iOS. It is, therefore, very complicated to clone your Kodi setup to an iOS device. There are ways around that limitation but they are out of the scope of this article. These are cases where it may be simpler to just reinstall Kodi on the new device.
- Android: Android/data/org.xbmc.kodi/files/.kodi/
Note: You might have to set your file explorer app to show hidden files. This option is usually accessible through the file explorer app’s settings menu.
- LibreELEC/OpenELEC: /storage/.kodi/
Firestick - Install Kodi
On the firestick simply use the pre-installed Downloader app and head to kodi.tv and download the 32 bit Arm version of Kodi.
Looking to Load Kodi on to a Firestick? Be Sure to Check This Out!
Need simple steps to “side load” Kodi on to a Firestick, Check out this article.
![]() How To? - Install Kodi on an Amazon Firestick
How To? - Install Kodi on an Amazon Firestick
Firestick - Cloning another Kodi Install
For a firestick, you can speed things up by cloning a previous install of Kodi. To clone, you will need to load either Files by Google - Files by Google allows android users to access their Google resources (and cloud files) from Android or other 3rd party options like File Commander Manager & Vault.
Files by Google

 Files by Google
Files by Google lets users log into their google account and access their cloud storage. Ideal for those who have a google account. It also has a built-in sharing capability between devices that makes it ideal for sharing files for cloning a kodi build.
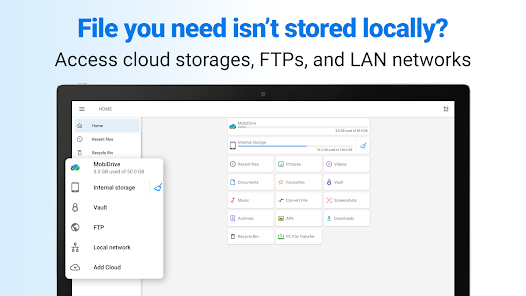
File Commander Manager & Vault
(*Note: ES File Explorer has previously been removed from Google play due to security concerns)
 File Commander Manager & Vault
File Commander comes with 5GB of Free MobiDrive cloud storage (50GB for Premium). Their cloud provides easy file and folder sharing alongside smart offline access to MobiDrive files without an internet connection.
Once loaded, you may need to toggle on “show hidden files/folders” as you will need to navigate to the “.Kodi” directory which is a hidden directory located at “Android/data/org.xbmc.kodi/files/.kodi/”. In this directory there are the three configuration directories that you want to clone.
Direct Transfer Using the Local Network
- Use this method if both devices are connected to the same local network and the source Kodi data folder is available as a network share.
- From the File Commander Manager & Vault app from the left side menu you can use local device storage, local network or cloud storage.
- Using the Local Network option your source computer should appear. You can then navigate it to find its Kodi data folder you want to save/copy.
- If you don’t see the source computer or the share or you can’t navigate to the Kodi data folder, check your sharing parameters on your source computer. If you change them, be patient as some sharing changes can take a few minutes to take effect.
- Once you can see the source folders (we are going to copy 5 folders) in File Commander Manager & Vault on the Fire Tv Stick, you’re ready to start copying them. Copy each of the addons, media, and userdata folders.
- The Fire TV Stick’s user interface is a bit tricky to use but you now need to move back to the menu on the left, go down to the bottom and find and click the Copy button.
- Go back to the Network tab on the left side. This time, click Local and navigate to Android/data/org.xbmc.kodi/files/.kodi/.
- Once you’re there, click the Paste button. When prompted to overwrite the existing files, click Overwrite.
Depending on the size of the data you’re transferring, the copying can take several minutes. Once the copy completes, you can start Kodi on the target device and verify that everything installed properly.
Want to Run File Commander on PC?
If you want to run File Commander Manager & Vault (and other Android Apps) you will need an emulator. Try using Game Loop.
File Commander Manager & Vault with GameLoop on PC
- Download GameLoop from the official website, then run the exe file to install GameLoop
- Open GameLoop and search for “File Commander Manager & Vault” , find File Commander Manager & Vault in the search results and click “Install”
- Enjoy using File Commander Manager & Vault on GameLoop
Clean Up Log File Issues for Legacy Addons
So you have added and removed some repos and addons but even thou you have removed them from your Kodi build, errors still pop up and clogging up you log.
Probably at some point you had those addons installed and altough you removed them you still have left overs in your addons database (db). A quick and dirty fix is to just rename your addons db file and restart Kodi from scratch and then re-enable all your addons that you want/need..
Change Where Trailers are Loaded (Confluence)
Scrapers set the source of the trailers, The default is usually YouTube but this requires a setup. Change the setting in the scrapper to not use YouTube and you can have it use other sources like IMDB.
For example, if you are using “The Movie Database Python” as the information addon - go into configuration-general and toggle off “Enable Trailer (YouTube)”
Note: this change affects going forward searches in the addons and does not change the COnfluence skin (i.e. when you have a Library of Movies - they still try to go to YouTube).
Disable the Trailer button on Movie information Screen for Movies in a Library. This is a "hack' as it just removes the Trailer button from the Dialog.
To hide the button from the Dialog box you need to modify the xml file controlling the skin. So edit the "DialogVideoInfo.xml" file in ".kodi/addons/skin.confluence/720p/".
Near the bottom of the file for button ID 11 - just hard code a "false" for the visibility flag.
<control type="button" id="11">
<description>Play Trailer</description>
<include>ButtonInfoDialogsCommonValues</include>
<label>20410</label>
<visible>false</visible>
</control>
Change Number of Recent Videos on Home Screen (Confluence)
Unfortunately, this is not a user setting and has to be changed in the xml file controlling the skin. So edit the "IncludesHomeREcentlyAdded.xml" file in ".kodi/addons/skin.confluence/720p/".
You are looking for:
Movies:
<content target="video" sortorder="descending" sortby="dateadded" limit="50">videodb://movies/titles/?xsp=%7B%22rules%22%3A%7B%22and%22%3A%5B%7B%22field%22%3A%22playcount%22%2C%22operator%22%3A%22is%22%2C%22value%22%3A%220%22%7D%5D%7D%2C%22type%22%3A%22movies%22%7D</content>
TV Shows:
<content target="video" sortorder="descending" sortby="dateadded" limit="15">videodb://tvshows/titles/-1/-1/?xsp=%7B%22rules%22%3A%7B%22and%22%3A%5B%7B%22field%22%3A%22playcount%22%2C%22operator%22%3A%22is%22%2C%22value%22%3A%220%22%7D%5D%7D%2C%22type%22%3A%22episodes%22%7D</content>
Change the limit to what you want - say 50
File Manager in Favourites and on Main Screen (Search Icon)
To add File Manager to Favourites - place the following in your Favourites.xml in userdata
<favourite name="[COLOR cyan]¤ File Manager ¤[/COLOR]" thumb="defaultnetwork.png">ActivateWindow(filemanager)</favourite>
Main Screen Search Icon
To change the button from global search to launch the file Manager, you need to modify the xml file controlling the skin. So edit the "Home.xml" file in ".kodi/addons/skin.confluence/720p/".
You are looking for the global search button control code:
<control type="group">
<visible>!Skin.HasSetting(HomepageHideSearch)</visible>
<animation effect="slide" start="0,0" end="-55,0" time="0" condition="Skin.HasSetting(HomepageHideFavourite)">conditional</animation>
<control type="button" id="22">
<description>Search push button</description>
<left>110</left>
<top>0</top>
<width>45</width>
<height>45</height>
<label>137</label>
<font/>
<onclick condition="System.AddonIsEnabled(script.globalsearch)">RunScript(script.globalsearch)</onclick>
<onclick condition="!System.AddonIsEnabled(script.globalsearch) + System.HasAddon(script.globalsearch)">EnableAddon(script.globalsearch)</onclick>
<onclick condition="!System.HasAddon(script.globalsearch)">InstallAddon(script.globalsearch)</onclick>
<texturefocus border="5">floor_buttonFO.png</texturefocus>
<texturenofocus border="5">floor_button.png</texturenofocus>
<onleft>20</onleft>
<onright>21</onright>
<onup>9002</onup>
<ondown>9003</ondown>
</control>
<control type="image">
<description>Search Icon</description>
<left>115</left>
<top>5</top>
<width>35</width>
<height>35</height>
<aspectratio>keep</aspectratio>
<texture>icon_search.png</texture>
</control>
</control>
</control>
Change this code to:
<control type="group">
<visible>!Skin.HasSetting(HomepageHideSearch)</visible>
<animation effect="slide" start="0,0" end="-55,0" time="0" condition="Skin.HasSetting(HomepageHideFavourite)">conditional</animation>
<control type="button" id="22">
<description>Search push button</description>
<left>110</left>
<top>0</top>
<width>45</width>
<height>45</height>
<label>137</label>
<font/>
<onclick>ActivateWindow(filemanager)</onclick>
<texturefocus border="5">floor_buttonFO.png</texturefocus>
<texturenofocus border="5">floor_button.png</texturenofocus>
<onleft>20</onleft>
<onright>21</onright>
<onup>9002</onup>
<ondown>9003</ondown>
</control>
<control type="image">
<description>Search Icon</description>
<left>115</left>
<top>5</top>
<width>35</width>
<height>35</height>
<aspectratio>keep</aspectratio>
<texture>icon_search.png</texture>
</control>
</control>
</control>
Increasing Cache/Buffer Allocation
For devices with more memory - you can allocate more cache memory / buffering mode and read factor. For a 3 Mbyte box or higher you can try the following advancedsettings file. Simply click below and save these settings into a file "advancedsettings.xml" and place in userdata directory of your kodi install.
Unhide System Menu
At times you will have a Kodi build that hides your system menu. You will need to edit the "Settings.xml" file in your userdata directory. For Windows installs:
1. Exit Kodi
2. Go to \AppData\Roaming\Kodi\userdata\addon_data\skin.confluence folder
3. Open the settings.xml file.
4. Look for <setting id="homemenunosystembutton" type="bool">false</setting>
5. It should be true on your system. Change it to false
Restart.
Organizing Favourites
If you start using favourites to jump to shows, create shortcuts, etc., the list can get difficult to manage - say keep in alphabetical order. There is a nice lightweight addon that can help manage your Favourites.
HowTo? - Install "Insert/Swap Kodi Favourites" - a Kodi - GitHub Program Addon